Quickstart: SolidJS
Intro#
This example provides the steps to build a basic user management app. It includes:
- Supabase Database: a Postgres database for storing your user data.
- Supabase Auth: users can sign in with magic links (no passwords, only email).
- Supabase Storage: users can upload a photo.
- Row Level Security: data is protected so that individuals can only access their own data.
- Instant APIs: APIs will be automatically generated when you create your database tables.
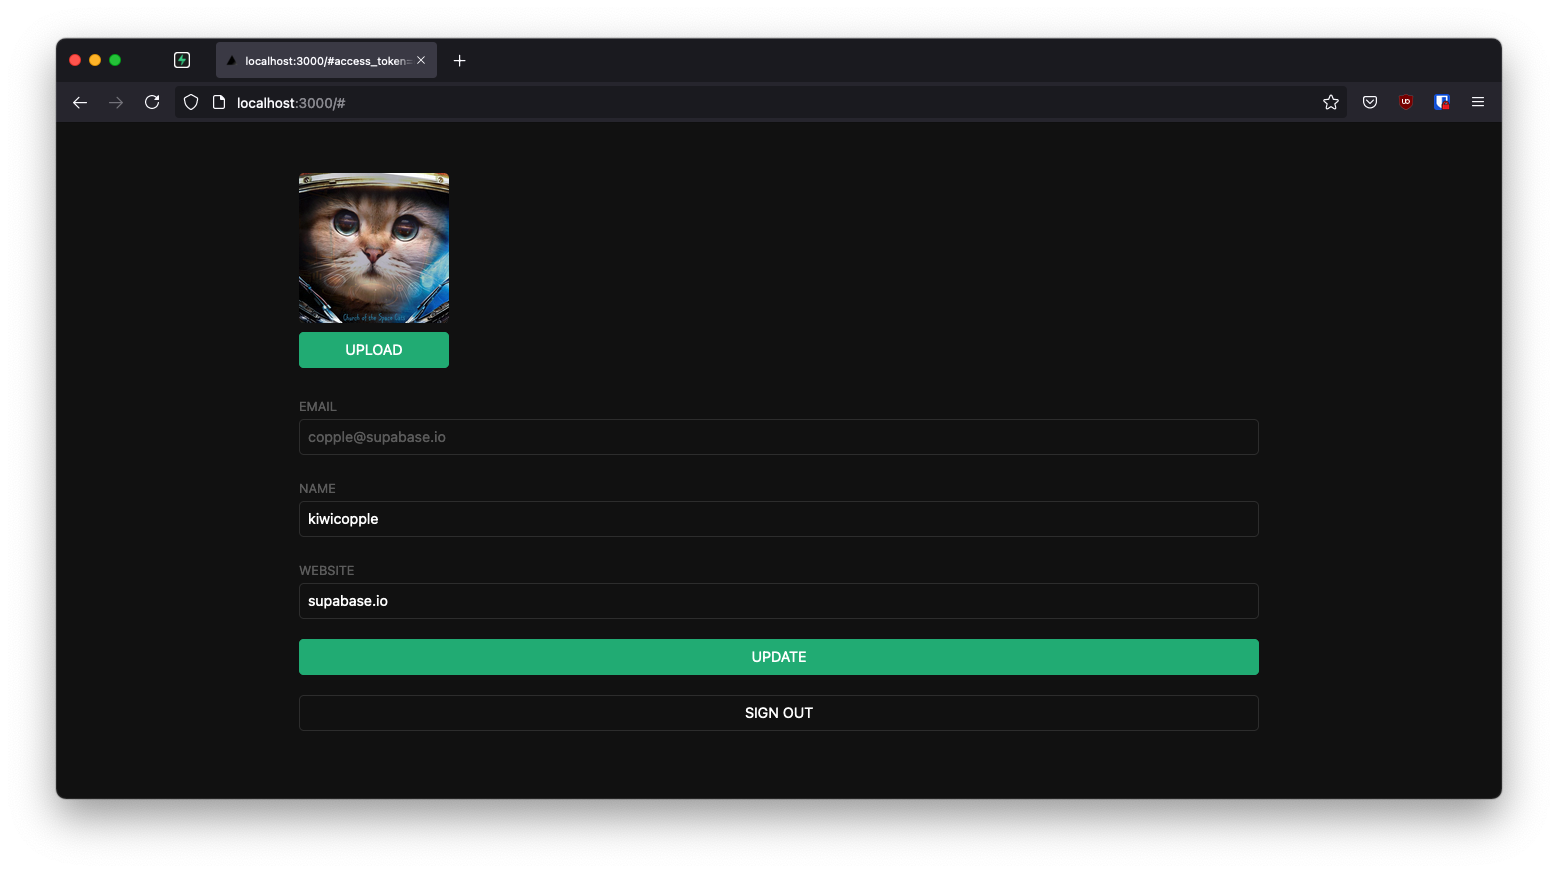
By the end of this guide you'll have an app which allows users to login and update some basic profile details:
GitHub#
Should you get stuck while working through the guide, refer to this repo.
Project set up#
Before we start building we're going to set up our Database and API. This is as simple as starting a new Project in Supabase and then creating a "schema" inside the database.
Create a project#
- Go to app.supabase.com.
- Click on "New Project".
- Enter your project details.
- Wait for the new database to launch.
Set up the database schema#
Now we are going to set up the database schema. We can use the "User Management Starter" quickstart in the SQL Editor, or you can just copy/paste the SQL from below and run it yourself.
- Go to the SQL Editor page in the Dashboard.
- Click User Management Starter.
- Click Run.
Get the API Keys#
Now that you've created some database tables, you are ready to insert data using the auto-generated API.
We just need to get the URL and anon key from the API settings.
- Go to the Settings page in the Dashboard.
- Click API in the sidebar.
- Find your API
URL,anon, andservice_rolekeys on this page.
Building the App#
Let's start building the SolidJS app from scratch.
Initialize a SolidJS app#
We can use Degit to initialize an app called supabase-solid:
npx degit solidjs/templates/ts supabase-solid
cd supabase-solid
Then let's install the only additional dependency: supabase-js
npm install @supabase/supabase-js
And finally we want to save the environment variables in a .env.
All we need are the API URL and the anon key that you copied earlier.
.envVITE_SUPABASE_URL=YOUR_SUPABASE_URL
VITE_SUPABASE_ANON_KEY=YOUR_SUPABASE_ANON_KEY
Now that we have the API credentials in place, let's create a helper file to initialize the Supabase client. These variables will be exposed on the browser, and that's completely fine since we have Row Level Security enabled on our Database.
src/supabaseClient.jsx1import { createClient } from '@supabase/supabase-js'
2
3const supabaseUrl = import.meta.env.VITE_SUPABASE_URL
4const supabaseAnonKey = import.meta.env.VITE_SUPABASE_ANON_KEY
5
6export const supabase = createClient(supabaseUrl, supabaseAnonKey)
And one optional step is to update the CSS file src/index.css to make the app look nice.
You can find the full contents of this file here.
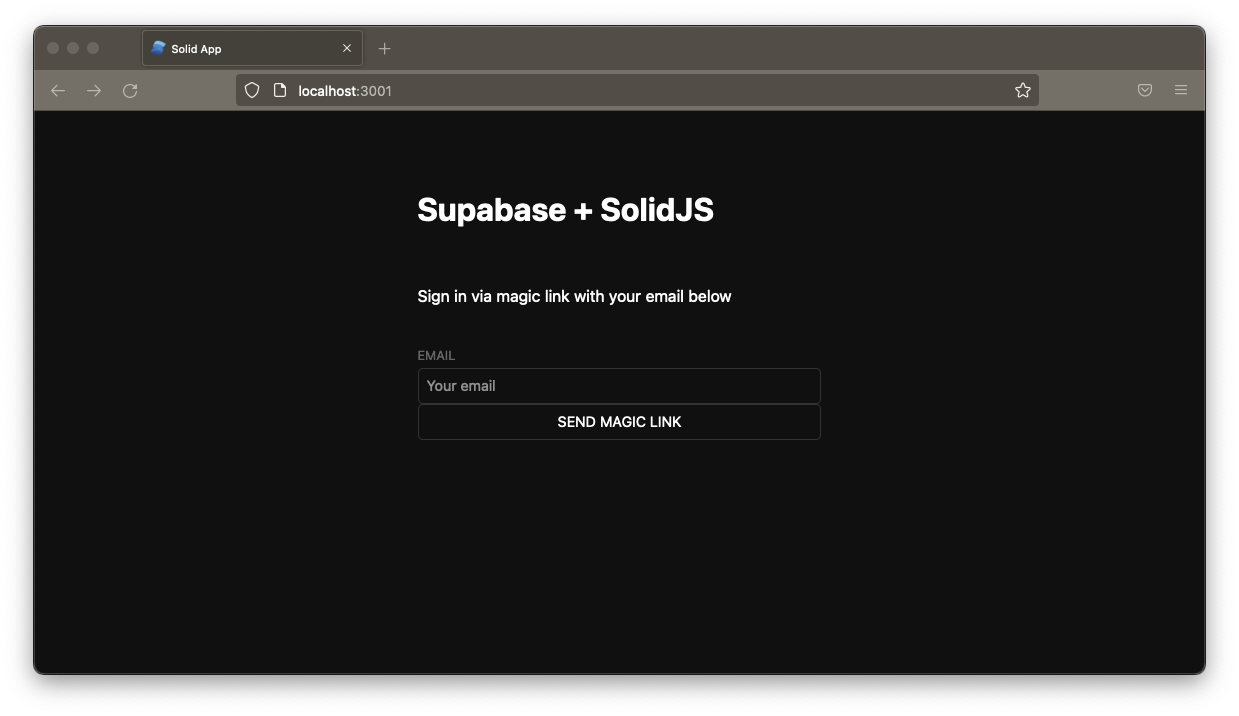
Set up a Login component#
Let's set up a SolidJS component to manage logins and sign ups. We'll use Magic Links, so users can sign in with their email without using passwords.
src/Auth.tsx1import { createSignal } from 'solid-js'
2import { supabase } from './supabaseClient'
3
4export default function Auth() {
5  const [loading, setLoading] = createSignal(false)
6  const [email, setEmail] = createSignal('')
7
8  const handleLogin = async (e: SubmitEvent) => {
9    e.preventDefault()
10
11    try {
12      setLoading(true)
13      const { error } = await supabase.auth.signInWithOtp({ email: email() })
14      if (error) throw error
15      alert('Check your email for the login link!')
16    } catch (error) {
17      if (error instanceof Error) {
18        alert(error.message)
19      }
20    } finally {
21      setLoading(false)
22    }
23  }
24
25  return (
26    <div class="row flex-center flex">
27      <div class="col-6 form-widget" aria-live="polite">
28        <h1 class="header">Supabase + SolidJS</h1>
29        <p class="description">Sign in via magic link with your email below</p>
30        <form class="form-widget" onSubmit={handleLogin}>
31          <div>
32            <label for="email">Email</label>
33            <input
34              id="email"
35              class="inputField"
36              type="email"
37              placeholder="Your email"
38              value={email()}
39              onChange={(e) => setEmail(e.currentTarget.value)}
40            />
41          </div>
42          <div>
43            <button type="submit" class="button block" aria-live="polite">
44              {loading() ? <span>Loading</span> : <span>Send magic link</span>}
45            </button>
46          </div>
47        </form>
48      </div>
49    </div>
50  )
51}
Account page#
After a user is signed in we can allow them to edit their profile details and manage their account.
Let's create a new component for that called Account.tsx.
src/Account.tsx1import { AuthSession } from '@supabase/supabase-js'
2import { Component, createEffect, createSignal } from 'solid-js'
3import { supabase } from './supabaseClient'
4
5interface Props {
6  session: AuthSession;
7}
8
9const Account: Component<Props> = ({ session }) => {
10  const [loading, setLoading] = createSignal(true)
11  const [username, setUsername] = (createSignal < string) | (null > null)
12  const [website, setWebsite] = (createSignal < string) | (null > null)
13  const [avatarUrl, setAvatarUrl] = (createSignal < string) | (null > null)
14
15  createEffect(() => {
16    getProfile()
17  })
18
19  const getProfile = async () => {
20    try {
21      setLoading(true)
22      const { user } = session
23
24      let { data, error, status } = await supabase
25        .from('profiles')
26        .select(`username, website, avatar_url`)
27        .eq('id', user.id)
28        .single()
29
30      if (error && status !== 406) {
31        throw error
32      }
33
34      if (data) {
35        setUsername(data.username)
36        setWebsite(data.website)
37        setAvatarUrl(data.avatar_url)
38      }
39    } catch (error) {
40      if (error instanceof Error) {
41        alert(error.message)
42      }
43    } finally {
44      setLoading(false)
45    }
46  }
47
48  const updateProfile = async (e: Event) => {
49    e.preventDefault()
50
51    try {
52      setLoading(true)
53      const { user } = session
54
55      const updates = {
56        id: user.id,
57        username: username(),
58        website: website(),
59        avatar_url: avatarUrl(),
60        updated_at: new Date().toISOString(),
61      }
62
63      let { error } = await supabase.from('profiles').upsert(updates)
64
65      if (error) {
66        throw error
67      }
68    } catch (error) {
69      if (error instanceof Error) {
70        alert(error.message)
71      }
72    } finally {
73      setLoading(false)
74    }
75  }
76
77  return (
78    <div aria-live="polite">
79      <form onSubmit={updateProfile} class="form-widget">
80        <div>Email: {session.user.email}</div>
81        <div>
82          <label for="username">Name</label>
83          <input
84            id="username"
85            type="text"
86            value={username() || ''}
87            onChange={(e) => setUsername(e.currentTarget.value)}
88          />
89        </div>
90        <div>
91          <label for="website">Website</label>
92          <input
93            id="website"
94            type="text"
95            value={website() || ''}
96            onChange={(e) => setWebsite(e.currentTarget.value)}
97          />
98        </div>
99        <div>
100          <button type="submit" class="button primary block" disabled={loading()}>
101            {loading() ? 'Saving ...' : 'Update profile'}
102          </button>
103        </div>
104        <button type="button" class="button block" onClick={() => supabase.auth.signOut()}>
105          Sign Out
106        </button>
107      </form>
108    </div>
109  )
110}
111
112export default Account
Launch!#
Now that we have all the components in place, let's update App.tsx:
src/App.tsx1import { Component, createEffect, createSignal } from 'solid-js'
2import { supabase } from './supabaseClient'
3import { AuthSession } from '@supabase/supabase-js'
4import Account from './Account'
5import Auth from './Auth'
6
7const App: Component = () => {
8  const [session, setSession] = createSignal<AuthSession | null>(null)
9
10  createEffect(() => {
11    supabase.auth.getSession().then(({ data: { session } }) => {
12      setSession(session)
13    })
14
15    supabase.auth.onAuthStateChange((_event, session) => {
16      setSession(session)
17    })
18  })
19
20  return (
21    <div class="container" style={{ padding: '50px 0 100px 0' }}>
22      {!session() ? <Auth /> : <Account session={session()!} />}
23    </div>
24  )
25}
26
27export default App
Once that's done, run this in a terminal window:
npm start
And then open the browser to localhost:3000 and you should see the completed app.
Bonus: Profile photos#
Every Supabase project is configured with Storage for managing large files like photos and videos.
Create an upload widget#
Let's create an avatar for the user so that they can upload a profile photo. We can start by creating a new component:
src/Avatar.tsx1import { Component, createEffect, createSignal, JSX } from 'solid-js'
2import { supabase } from './supabaseClient'
3
4interface Props {
5  size: number
6  url: string | null
7  onUpload: (event: Event, filePath: string) => void
8}
9
10const Avatar: Component<Props> = (props) => {
11  const [avatarUrl, setAvatarUrl] = createSignal<string | null>(null)
12  const [uploading, setUploading] = createSignal(false)
13
14  createEffect(() => {
15    if (props.url) downloadImage(props.url)
16  })
17
18  const downloadImage = async (path: string) => {
19    try {
20      const { data, error } = await supabase.storage.from('avatars').download(path)
21      if (error) {
22        throw error
23      }
24      const url = URL.createObjectURL(data)
25      setAvatarUrl(url)
26    } catch (error) {
27      if (error instanceof Error) {
28        console.log('Error downloading image: ', error.message)
29      }
30    }
31  }
32
33  const uploadAvatar: JSX.EventHandler<HTMLInputElement, Event> = async (event) => {
34    try {
35      setUploading(true)
36
37      const target = event.currentTarget
38      if (!target?.files || target.files.length === 0) {
39        throw new Error('You must select an image to upload.')
40      }
41
42      const file = target.files[0]
43      const fileExt = file.name.split('.').pop()
44      const fileName = `${Math.random()}.${fileExt}`
45      const filePath = `${fileName}`
46
47      let { error: uploadError } = await supabase.storage.from('avatars').upload(filePath, file)
48
49      if (uploadError) {
50        throw uploadError
51      }
52
53      props.onUpload(event, filePath)
54    } catch (error) {
55      if (error instanceof Error) {
56        alert(error.message)
57      }
58    } finally {
59      setUploading(false)
60    }
61  }
62
63  return (
64    <div style={{ width: props.size }} aria-live="polite">
65      {avatarUrl() ? (
66        <img
67          src={avatarUrl()!}
68          alt={avatarUrl() ? 'Avatar' : 'No image'}
69          class="avatar image"
70          style={{ height: `${props.size}px`, width: `${props.size}px` }}
71        />
72      ) : (
73        <div
74          class="avatar no-image"
75          style={{ height: `${props.size}px`, width: `${props.size}px` }}
76        />
77      )}
78      <div style={{ width: `${props.size}px` }}>
79        <label class="button primary block" for="single">
80          {uploading() ? 'Uploading ...' : 'Upload avatar'}
81        </label>
82        <span style="display:none">
83          <input
84            type="file"
85            id="single"
86            accept="image/*"
87            onChange={uploadAvatar}
88            disabled={uploading()}
89          />
90        </span>
91      </div>
92    </div>
93  )
94}
95
96export default Avatar
Add the new widget#
And then we can add the widget to the Account page:
src/Account.tsx1// Import the new component
2import Avatar from './Avatar'
3
4// ...
5
6return (
7  <form onSubmit={updateProfile} class="form-widget">
8    {/* Add to the body */}
9    <Avatar
10      url={avatarUrl()}
11      size={150}
12      onUpload={(e: Event, url: string) => {
13        setAvatarUrl(url)
14        updateProfile(e)
15      }}
16    />
17    {/* ... */}
18  </div>
19)
Next steps#
At this stage you have a fully functional application!
- Got a question? Ask here.
- Sign in: app.supabase.com